

How to Make a Leather Hooded Cloak: A Step-by-Step Guide

Creating a leather hooded cloak adds a rugged, stylish element to your wardrobe, perfect for cosplay, medieval events, or simply making a fashion statement. This guide will walk you through making your own leather hooded cloak, ensuring it is both functional and eye-catching.
Materials You Will Need:

- Leather Fabric: Choose a soft, pliable leather, such as cowhide or lambskin. Pure cow leather is ideal for durability and texture.
- Lining Fabric (optional): Satin or a soft cotton lining can add comfort and warmth.
- Leather Sewing Machine Needles: Strong needles designed for sewing leather.
- Heavy-duty Thread: Matching color to your leather, designed specifically for leather stitching.
- Scissors: Sharp fabric scissors, ideally those designed for cutting leather.
- Measuring Tape: For accurate measurements.
- Clips: Use clips instead of pins to avoid leaving holes in the leather.
- Chalk or Fabric Marker: For marking cutting lines on the leather.
- Pattern Paper: To draw out your pattern.
-
Closures: A strong clasp, metal buckle, or leather tie for the front.
Step-by-Step Instructions:

Step 1: Measure and Plan
- Measure Your Height: This will determine the length of the cloak. Measure from the nape of your neck to your desired length (e.g., ankle-length or knee-length).
- Measure Your Hood: Measure around your head from shoulder to shoulder, over your head, to get the hood’s length and width.
-
Decide on the Width: For leather, less fullness may be preferable due to weight. Typically, the width is about one and a half times your shoulder measurement.
Step 2: Create a Pattern

- Draw the Cloak Shape: On your pattern paper, draw a large semi-circle or quarter-circle for the leather cloak. The straight edge will be the top of the cloak, and the curved edge will be the bottom.
- Draw the Hood: Draw a rectangle for the hood, based on your head measurements, adding an extra inch for seam allowance.
-
Add Seam Allowances: Add at least half an inch around all pattern pieces for seams.
Step 3: Cut Out the Leather
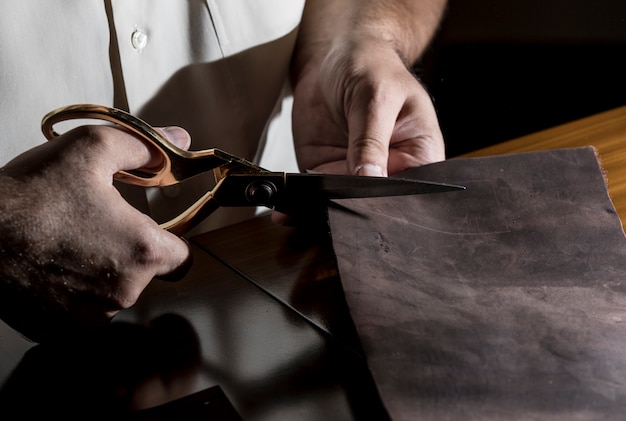
- Lay Out the Leather: Place your leather flat on a large surface. If it's folded, make sure the right sides are facing inward.
- Clip the Pattern: Use clips to hold your pattern to the leather securely.
-
Cut the Leather: Cut along the pattern lines carefully. Leather is more challenging to cut than fabric, so take your time.
Step 4: Sew the Hood
- Clip the Hood Pieces Together: With the right sides facing, clip along the top curved edge of the hood.
- Sew the Seam: Using a leather needle and heavy-duty thread, sew the top seam of the hood. Use a longer stitch length to avoid perforating the leather.
-
Hem the Hood Opening: Fold the raw edge of the hood opening inward and sew a hem to finish the edge neatly.
Step 5: Attach the Hood to the Cloak
- Find the Center: Mark the center of the cloak’s top edge and the center of the hood’s bottom edge.
- Clip the Hood to the Cloak: Align these center points and clip the hood to the cloak, right sides facing each other.
-
Sew the Hood to the Cloak: Sew along the clipped edge, attaching the hood to the cloak. A strong seam here is crucial for durability.
Step 6: Finish the Edges
- Hem the Cloak’s Bottom: Fold the raw edge of the bottom of the cloak inward and sew a hem to finish the edge. Leather edges may not fray but hemming provides a finished look.
-
Sew the Front Edges: Fold and hem the front edges of the cloak for a clean finish.
Step 7: Add a Closure
- Choose a Closure: A sturdy clasp, metal buckle, or leather tie can secure the cloak.
-
Attach the Closure: Sew or attach your chosen closure method securely at the neck.
Tips for Working with Leather
- Use Specialized Tools: Leather requires special needles and thread. Ensure your sewing machine can handle leatherwork.
- Avoid Pins: Use clips to hold pieces together to prevent making holes in the leather.
-
Leather Care: Use a leather conditioner to keep the cloak soft and pliable. Avoid excessive moisture.
FAQs
Q: How much Leather do I need for a Hooded Cloak?
A: The amount of leather needed will vary based on the cloak's size and length, but generally, 2-3 yards of leather will suffice for a full-length cloak.
Q: Can I make a Leather Cloak without a Sewing Machine?
A: Yes, but hand-sewing leather is time-consuming and requires strong hand stitching techniques and tools like leather needles and waxed thread.
Q: What type of Leather is Best for a Cloak?
A: Soft cowhide or lambskin is ideal due to their flexibility and comfort, while still being durable.
Q: How do I care for a Leather Cloak?
A: Keep the leather clean by wiping it down with a damp cloth. Use leather conditioner regularly to maintain its softness and prevent drying out. Store it away from direct sunlight and in a cool, dry place.
By following these steps, you can create a beautiful and durable leather hooded cloak that will be both functional and stylish. Enjoy your crafting!
Leave a comment
Search Blogs
Featured Products

Our Recent Blogs

Shower Sex Guide: How to Make It Hot, Safe & Enjoyable (2025 Edition)
Shower sex can be steamy, sensual, and fun—but it’s also slippery without the right prep....
Read More
Fetish vs. Kink: What’s the Difference? (2025 Guide)
Short answer: a kink is an unconventional interest or activity that can enhance arousal; a...
Read More
The Deep Intimacy of a Power Exchange Relationship
A power exchange relationship is more than control—it’s trust, consent, and deep intimacy. Learn its...
Read More
POST COMMENTS